
BUT.... Things happened in the workshop during the last days of Sole´s life. I built my guitar number 100...... Just a number, I know, but a special one and because of the timing a very special one. It was built together with number 99, which can be seen on my blog. I was aware of the very difficult situation I was in, so I chosed to build both 99 and 100 as “free” guitars. They were not orders and when finished, they´ll be put up for sale.
I wasnt in the mood to write about number 100 back then. I didnt have the energy and I concentrated 100% in being with Sole and working when I had my hours off. The workshop was pure therapy and I know that it helped me through a very difficult period. I took a lot of photos of the process and I will SLOWLY post them and if I find the energy, write a bit about the proces. Its not going to be a “how to build a flamenco guitar” thread. I´m not that kind of person and I believe that we all have to find our own way.
So, I will start with a photo of where I am right now... Or more or less. This is the guitar in raw before French polishing. I´ve just started the FP. The guitar has been hanging in my workshop with controlled climate for 2 month and the wood has taken a little bit of color from the light. Thats very beautifull and will make the FP look deeper. Maybe I should do things like the old violinmakers did. Hang the instrument in the sun for some month, so that it takes its natural color before you start putting FP on it. It would look great with a couple of raw wood guitars hanging in my lemon tree.

Its a traditional Blanca with wooden pegs. (They can be changed to mechanical pegs) 650mm scale, 53mm nut, Its going to be natural color. There are a few minor extras in purfling, bridge and rosette. More about that later.
I chosed to build a Blanca with pegs for a couple of reasons: I like them. They are the “real” thing. Very vibrant and I cant imagine the history of flamenco without Blancas with pegs. Also, I´ve made a lot of them over the years. Maybe some 25% of my building has been pegheads. And finally, beauty... IMHO, its the most beautifull flamenco guitar.
Everything is standard. German spruce (master grade). Mediterranean Cypress back and sides, Honduran Cedar neck, Ebony fingerboard and a very pretty Caviuna headplate.
Starting the neck
So here is where it all started.
The neck blank I had prepared the summer before. Sometimes, I prepare some 8 - 10 necks, half of them with the headplate glued on and the rest without. Its a good feeling to have them ready.
This one was only with the scarf joint made and nothing else. On the first photo, I slowly make some very thin shavings in order to make the head totally flat and ready for the headplate. On the second, the headplate is glued on.

The Headstock.
Next step is to sculp the headstock. First you see a
template on the square head. I cut it all by hand. I dont like setting
up routers, jigs etc and besides, I like the organic look of a not
totally perfect headstock. I like when you can see that its been made
with hands.
2nd photo is of the finished head with 6 - 6mm holes, where the pegs will be. That piece of Caviuna is really pretty and it´ll get a very deep color when French polished.
2nd photo is of the finished head with 6 - 6mm holes, where the pegs will be. That piece of Caviuna is really pretty and it´ll get a very deep color when French polished.


The making of the heel begins.
First glue a block of cedar on the neck. Make sure that the surfaces are level. This I do by rubbing the neck blank and the block on a flat sanding board.
Next is to make the cut for the sides.
First glue a block of cedar on the neck. Make sure that the surfaces are level. This I do by rubbing the neck blank and the block on a flat sanding board.
Next is to make the cut for the sides.


Making the heel
So here we go with some more sculping. This is a part
of the building that I really like a lot. I like to play with sharp
handtools and when I was younger I did fencing as a sport (touché)
Again, a lot this can be done with jigs and power tools, but I prefer the organic feel of a handcut heel. It might not end up being perfectly symmetric, but is that important? I prefer when it looks good and handmade.
At first I cut the ramps on both sides with a chisel, then I raw cut with a whitling knife and finally the whole thing is finished of with scrapers and sandpaper.


Preparing the pegs and the headstock.
There are basically 3 important things to work when making a headstock with wooden pegs:
1) To shave the pegs and make them thinner. No pegs are straight and they will all need to be shaved. Never mind the price you paid for them. The reason for making them thinner is to have a lower gear. The thinner the peg, the less string you move during one turn. I shave them down to about 6,5mm at the tip. if they are thinner than that, it starts looking to thin and flimsy.
2) To ream the headstock with a steady hand. This is in order to have the best fit of the pegs. While shaving the pegs is a easy task, reaming the headstock is a bit more complicated and you need to go slow and really feel the reemer in the wood.
3) Using a good pegdope. More on that when the guitar is ready to be stringed.


And here you have the headstock and neck as it looks before assembly.


Jointing and joining the plates
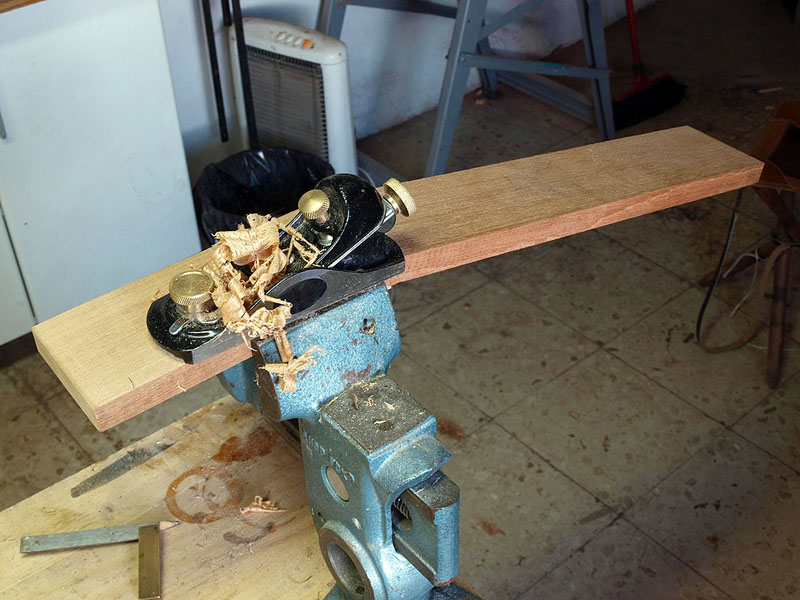
So here we go with the plates.
I´ve only taken photos of the top. The work with the back is basically the same. The main difference in my case is that I brace the back on a dished plate in order to give it a more rounded shape. The top I brace flat.
The first thing to do is to joint the the bookmached set of wood. This I do on a very simple setup. It works very well for me and therefor I´ve never wanted a more complex setup. The most important things are:
* Smooth base. This I actually give a drop of oil before laying down the plane on it.
* A very sharp and finely adjusted blade.
* Steady movements and use your ear. When you can to do a shave, with the same tone all the way through, its pretty sure that You´ve made a straight cut.
Next is to join the plates. Here I use another homemade jig that I´ve used since guitar number 1. Its all recycled things that I´ve found here and there. I had very little money and it was faster to go down to the local container and pick up what I needed, than to drive to town, waste half a day and buy the same things.


Rosette Making
My rosettes are all hand inlayed in a routed slot. I build them up one piece a time.
There are no pictures of the building of the rosette itself. Thats my little secret
The top picture shows the routing of the slot using a homemade routing jig and the second photo shows the finished rosette. The picture is actually from after assembly. The rosette center is made with heart of olive wood and the red rings are blood wood.


Taking the soundboard down to its (almost) final thickness
Soundwise, this is one of the most important steps in making a good guitar and I only do it when I feel good. I have to be tuned in myself in order to tune the soundboard.
two of my most important tools are a weight, to weigh the thing and a reference soundboard, which is a soundboard that I know, with a rosette inlayed. That I flex together with the soundboards that I´m working on. Then comparing and weighing I reach the point where I say thats it.
The thickness caliper is, of course, also important, but over the years, I´ve learnt not to use it to much, because each piece of wood is different and one piece of spruce ends up with 2,1mm while another ends up with 2,3mm and important... The thin one doesnt have to be the best. Not at all. What is important is to get it right. The thickness caliper I use mostly to make sure the soundboard has and even thickness.
First I use a drum sander, then a scraper and a palm sander with a 120 and later 240 grit paper.
Its important to leave the soundboard a bit thicker than you want it to be when the guitar has been finished. You have to scrape the bindings and final sand the whole guitar. This you´ll see later on in the process, but its where you devide the good builders and the not so good ones. Its very easy to take to much away especially close the the edges and then.... thats it. You cannot give it back.


Laying out the bracing system and bracing the soundboard.
After thicknessing the soundboard, I draw the bracing layout. This is my own bracing system. Not that its very special, but its not a copy, but something I´ve reached changing little things over the years.
I will make a describtion of the bracing system and my thoughts about it when I´ve posted the photos of the bracing and you can see the soundboard ready for assembly.

Next is to glue in the bridge strap and the soundhole "donut" After that, the soundhole is cut out.

After that, I fit and glue the 5 central braces and when the soundboard comes out of the press, it looks like this:
Its very important not to use a lot of pressure at this point If you do so, the braces will pop out on the soundboard surface and when you final sand, you´ll sand the soundboard to thin where the braces are resulting in a week soundboard.
Its very important not to use a lot of pressure at this point If you do so, the braces will pop out on the soundboard surface and when you final sand, you´ll sand the soundboard to thin where the braces are resulting in a week soundboard.

In the last session of the bracing, I brace the harmonic bars, the under fingerboard reinforcement and the closing struts.


On the above photo, you can se my
current bracing system which I´ve used exclusively on all my
flamencos for the last couple of years.
I have tried many different bracing
systems. Some with 5 , others with 7 main braces. Asymetrical and
I´ve also made copies...
The bridgestrap is very light. 1 mm
thick and 10 mm wide. It gives me control of what I do and in the end
balance and control is the most important factors in a good bracing
system. A lot more important than the system itself. When bracing
flat, this strap raises the soundboard some 2mm on the finished
guitar and it does that the outer edge of the soundboard does not
sink, which can be seen on many lightly braced flamenco guitars. Its
tapered from the outer braces toward the edge of the soundboard.
The 5 main braces are almost parallel.
This gives a soundboard with very little crossgrain stiffness and it
works with the bridge strap that adds a bit of crossgrain stiffness.
The closing struts also adds crossgrain stiffness in the lower bout.
On flamenco guitars I like that the
soundboard is not to controlled, that there are parts without much
tension. It gives a fast response and a tonal quality which I find to
be extremely important on a good flamenco guitar. And its where the
building of a flamenco guitar is very different from that of a
classical guitar.
Assembling the guitar
The first two things I do is to join the neck and soundboard and bend the sides in my homemade bending machine:


Next is to start the assembly in the solera.
On the top, you have the sides in the jig, and below you can see the endblock being glued on.
On the top, you have the sides in the jig, and below you can see the endblock being glued on.


After gluing in the tentellones (no photo) I final shape the sides and fit and glue the solid linings. (photo)

While joining the sides to the soundboard and neck, I braced and prepared the back:


So here´s the guitar ready for the back.
gluing the back to the sides.
Here its important not to put to much pressure. Those rubber bands can do harm to a 2mm thick side. Besides. There´s no need for a lot of pressure if you´ve done the preparation well.
Here its important not to put to much pressure. Those rubber bands can do harm to a 2mm thick side. Besides. There´s no need for a lot of pressure if you´ve done the preparation well.

So after that, we get the first real idea of how the
guitar will look. Here it is with the edges cleaned and ready for
binding and purfling.

Preparing for bindings and purflings.
The bindings, I make in my drum sander and the purflings are normally just layers of wood veneer glued together and cut out on the bandsaw. I say normally, because the soundboard of this guitar will have a 1mm thick veneer of bloodwod, that I cut on the bandsaw and finished in the drum sander.
The bindings and the soundboard purflings are bend in my bending machine and the purfling for the back, which is thinner is bent on a hot iron.

The guitar is the having the chanels routed. I make
what is callet a staircase, with different heights for the binding and
purfling. Here you see the routing for the soundboard:

Preparing the fingerboard:
My finger boards are normally around 5,5mm thick. I make tthe sides parallel with the plane and I cut the slots in my homemade gig. It works a thrill and again, mostly made with what I had lying around and what I´ve found. Its a good idea to put a bit of grease on the sides, where the runners are. Just a wee bit.
Next the fingerboard is individually fitted to the guitar. There´s alway a bit to be planed away on the bottom, between the 12th and the 19th fret.


gluing the fingerboard to the neck and body

So now its time to get serious... Really serious:
The final check of the thickness of the soundboard.
With a Hacklinger guide, I check the final thickness of the soundboard after the final sanding. There´s still time to do little corrections. IMHO, if you dont do this, you´re building guitars in the blind and you cannot control your output. We ALL make the edges thinner after gluing the bindings. Doesn´t matter if you sand or scrape. You remove wood. This has to be taken into consideration before the assembly and its good to try to hone your skills. I take the rough part of the bindings away with a gooseneck scraper in order to concentrate on a small surface, then after that, a thin square scraper and finally a small piece of sandpaper on a very small sanding block. And SLOW is a good word to remember. And its good to have very sharp scrapers.
In general, I prefer the edges to be around 0,2mm thinner than the center of the soundboard. On the picture, you can see that it clicks on 2,1 and the edges are 1,9mm thick. Thats thin, but this piece of German spruce is hard and strong, so its pretty normal.

The bridge.
Inbetween these labours, I made the bridge.
First, the slots are routed on my drill press, next, the bridge is shaped with rasps and sandpaper sticks and finally, the finished bridge with its decorative and protective plate.
Its a very high quality piece of Madagascar rosewood.
Inbetween these labours, I made the bridge.
First, the slots are routed on my drill press, next, the bridge is shaped with rasps and sandpaper sticks and finally, the finished bridge with its decorative and protective plate.
Its a very high quality piece of Madagascar rosewood.


So here we are where we began. The first photo
repeated together with one of the back. Here the guitar is ready to be
French Polished.


Preparing and gluing bridge
So here we have a timejump in 3 month and now we are almost real time.
I left the guitar for 2 month because of personal commitments and even though my workshop is pretty dark when the shutters of my main window are closed, the soundboard of the guitar clearly got darker and prettyer. And now the soundboard and the sides are in the same shade of colors. It´ll get darker with age.
Now its been French polished and here we go with the gluing of the bridge. The last item to be glued on.
First you can see how I´ve removed the shellack where the bridge will be and then a picture of the gluing process.


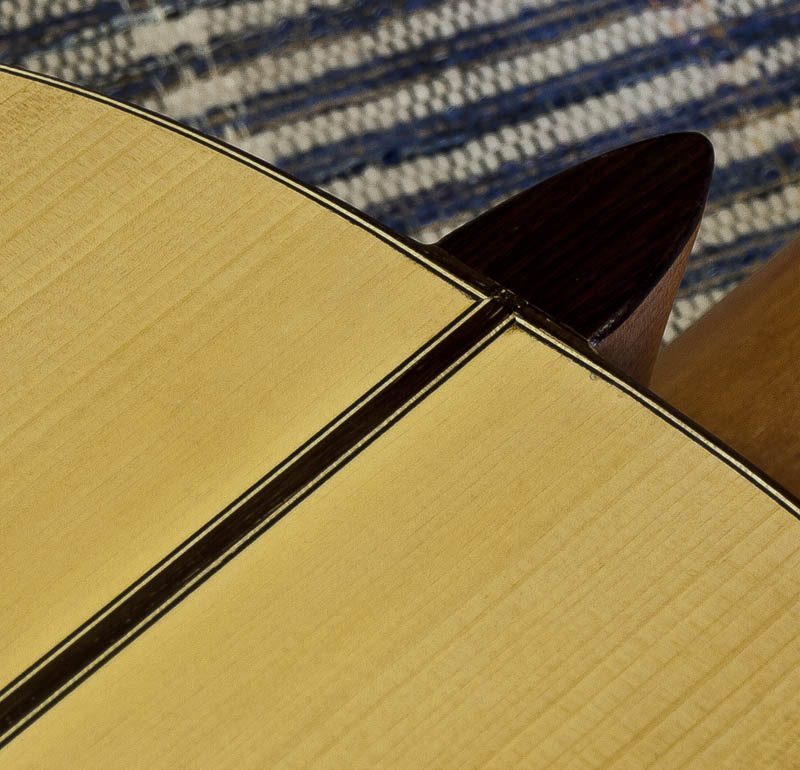
Some closeups of the purfling and bindings.
The purfling on the back is complicated to do because you have to miter it wit 45 degrees in both ends. So when you cut, you cut and if to short, to short.
The purfling on the back is complicated to do because you have to miter it wit 45 degrees in both ends. So when you cut, you cut and if to short, to short.


So, my last post on this page. A video playing some Fandangos de Huelva:
n
Thoroughly enjoying 'Building Guitar Number 100', it's already answered a lot of questions for me about how these things are done!
ResponderEliminarThanks Phil. That was the idea of this page and, of course, to make some pr.
ResponderEliminarThis is a lovely blog! I´ve been reading many of your post on the foro. And I must say that i´m starting to have an amazing interest for guitarmaking. So much that I´ve decided to start a building course in Málaga. I´m deeply impressed by the beauty and sound of the guitars you are making and I think your pictures and videos i´ve seen on youtube are the main reason I got interested in the art of guitarmaking. I wish you all the best in these difficult times and truely hope you are going to keep on building and posting pictures and stories about the proces for many more years.
ResponderEliminarThank you very much and good luck with everything!
Un abrazo Kun
Thanks a lot Kun and good luck with your guitarmaking adventure. Its a nice thing to do. Being hobby or work.
ResponderEliminarAnders,
ResponderEliminarWill you sell this guitar? I also enjoy your posts here and on the foro.
Regards,
Dennis Aberle
Don Dionisio
Hi Dennis
ResponderEliminarThe guitar is sold and on its way to Reno, Nevada.
BUT.... I can build more and my waiting list is short. It´ll just be another number (102, 103 etc.)
I feel very fortunate to have learned of Ander's work. I cannot wait until the guitar reaches Reno, Nevada!
ResponderEliminarHardeep
I have seen your name bounced around “foro flamenco” interested in getting a flamenci made or buying one if you keep stock. Let me have more info whenever possoble. Thank you, best regards.
ResponderEliminar