
Violin/fiddle number 1
On this page, I have put together all the posts of the building of my first violin/fiddle. This way its easyer to follow the process. In the end of the page there are final pictures and some soundclips of me playing the violin/fiddle

Things and dings for violin making
 The
last couple of days, I´ve made little things for building my first
violin. From the left you have the craddle and inside that on the top,
you have different clamping cauls and on the bottom you have templates
for arching the belly and the bottom. To the right you have the building
mould , to templates for cutting out the bottom and the belly and
finally a template for making the arch along the grain. I dont know when
I´ll start building the violin. Time will show....
The
last couple of days, I´ve made little things for building my first
violin. From the left you have the craddle and inside that on the top,
you have different clamping cauls and on the bottom you have templates
for arching the belly and the bottom. To the right you have the building
mould , to templates for cutting out the bottom and the belly and
finally a template for making the arch along the grain. I dont know when
I´ll start building the violin. Time will show....
Building violin number 1


Making the scroll and head of the violin
This is the way it looks now. Its far from being finished, The pin in the scroll is not totally straight from all angles, but you have to look with a critical eye to see that.
I will leave it like it is for now and do the final shaping and finishing off when I´ve made the box of the violin.


Starting the back of the violin


The back is one piece higly figured european maple. I have read , so I know that when building my first violin, I shouldnt use wood like that. Its to complicated to work with. But since I´m kinda stupid, very ignorant and a complete sucker for one piece higly figured maple violin backs, well, I decided to use this piece.
First the chunk is sawn more or less in size and with the drum sander taken down to 16mm thickness.
Next the thing is sawn out with the band saw...
Be carefull when chiseling curly maple. The grain is going everywhere. Be slow.

Carving the back
I really like this photo.

back rough finished on the outside

Preparing for the purfling


Back with purfling on

Working the inside of the back

So here I´ve done the the first part of the digging. There´s still a long way to go.
You can see the thickness I would like to achieve drawn with a pensil.

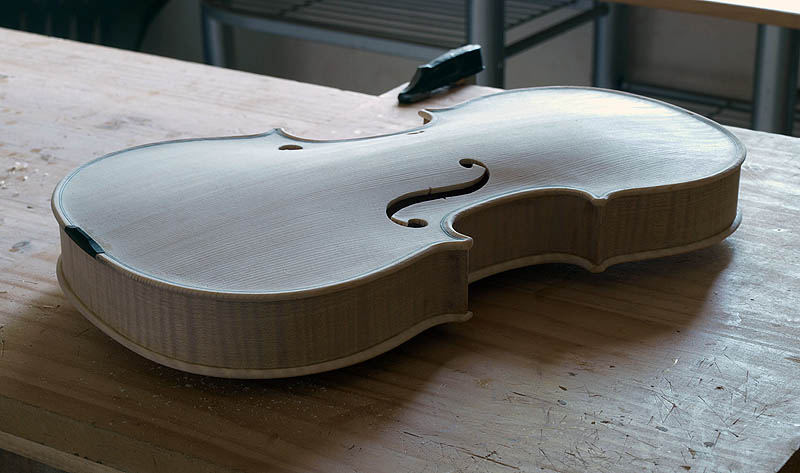
Back of violin almost finished
As you can see, I´m playing with light. The violin is much more a sculpture than a guitar and so its also more interesting taking pictures of it.


One more of the back. Its now on its final thickness. Weighs 94 grams and main resonance is just under F. Thats all very correct.
The outer edge is not finished and wont be done untill later. I´m happy with the inner edge, but the corners..... I didnt know what to do with them, so thats the way they look now

Starting the work on the soundboard of the violin

jointing the soundboard

gluing the top together

Top ready for f-holes

The happy violin builder
Here I am cutting the f-holes on a cutting V. The thing I like the most about building a violin is that its quiet and slow. I love that. Good for listening to music and besides, I strongly prefer cutting and scraping over sanding.


making a mini scraper
making a mini scraper. The hole in the middle is there, so that it can hang on a nail and not disappear just like the last one did......


Preparing the bass bar.
Its standard procedure to use chalk to fit the bass bar. You put chalk on the inside of the soundboard and rub the bass bar over it. The you cut away the parts of the bar where there´s chalk left untill you reach a point where the whole bar has chalk on its gluing side. Then its ready to be glued.

gluing and shaping the bass bar


Ready to assemble the body

Gluing the back to the sides:
This way you can control that everything stays where it should stay and its slow and relaxing. Two important words for me these days.


Gluing the belly


making the neck - body mortise

This is most probably the most delicate and difficult thing I´ve made untill now.
There are so many parameters that have to be correct. Strobels book says:
1) the fingerboard is centered over the front centerline.
2)The neck and scroll is vertical and not twisted sideways
3) The nut is 130mm from the upper front edge
4)The depth of the mortise lets the lower end of the neck extend to the inner edge of the purfling groove or a little past it.
5) the height of the fingerboard over the upper edge of the front is 6 - 6,5mm.
6)The projection of the fingerboard at the bridge line is 27 mm
7) The heel of the neck meets the back button tightly all around and is sufficient for the back button height of 13 mm.
That sounds easy. Just dont forget that all this has to be a very tight fit because its going to be glued with Hot hide glue.
So I sharpened the chisel and started sawing and cutting and I´m pretty sure its all correct. This can of course be done with jigs and routers, but there´s something about sawing and chiseling within tent of a milimeter early in the morning, so thats what I did. Just like the old masters.
Gluing neck and body

violin almost finished

The violin is basically finished now. I need to fit a bridge and string it up and then give it a test before varnishing.
Final setup violin
On the first photo you see a little home made tool for fitting the bridge. Its so easy to fit a bridge to a new instrument compared to an old one. The bridges always leave the soundboard a bit wobbly over the years/decades/centuries.
Next 2 photos is with strings on... Almost ready for the requested jig. The setup ended up being spot on with a bridge height of 34mm (standard setup) which I will lower 1 - 1,5mm because I use steel strings.


Testing the violin in white
I like the sound and feel of the instrument and I adapted to it very fast. It´ll change with varnish on, so its to early make to many conclusions, but the first impressions are possitive.
slowly starting the varnish of the violin

Violin in lemon tree
As you can see I´ve gone for a patina varnish. At first I finished the violin "straight. Just one color. The darkest.. It was pretty, but looked a bit dull and to "correct", so I decided to go ahead an make some "damage" on the varnish. Its done a lot on new violins, because potential owners, in this case me, dont like the look of a straight finished violin. A have a week pont when it comes to light colored edges and so on.
Maybe I´ve overdone it a bit, but I´m VERY happy with the colors.

Violin has strings on
The violin is very nice to play. Strobels book says main air resonance around a C and I was lucky to reach a C minus just a few cents below, which I think is better than a straight C in order to avoid wolftones.
The violin is very balanced with the 3rd string a little bit weaker. The 4th string is big and warm and the 1st and 2nd are fast and bright. Just like I wanted actually.
It´ll change. It still smells very strongly because the lacquer is not totally dry. Lets see how it sounds after a warm summer.


Testing the finished fiddle.
So here´s some recordings of the fiddle. I´m very happy with it.A set of Jigs:
Up Sligo, The rollicking boys around Tandaragee, Out with the boys
First a Hornpipe called ´The Drunken Sailors Hornpipe´
A set of reels, Sweeney´s Buttermilk/ Mason´s Apron
I really enjoyed reading this, and the playing as well! Very inspiring.
ResponderEliminarHey Anders!!! Du er for vild. Imponerende at se denne blog. Håber du nyder livets passage. Giv et kald hvis du er i KBH.
ResponderEliminarun abrazo Henrik Liebgott
PS Du ved sikkert nok at Bjerre ikke er her mere.