lunes, 30 de diciembre de 2013

Almost there


So here´s the box assembled and the neck ready to be fitted. The edges and the corners are still raw on this photo
 here´s the box, with edges and corners finished and the saddle installed and the neck mortise cut. Its now ready to be have the neck glued on.

viernes, 27 de diciembre de 2013

assembly

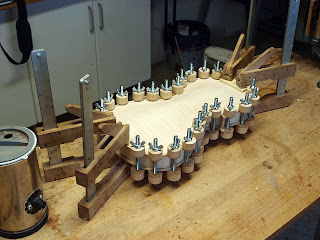
So here´s 2 photos form the assembly of the box.
First the 3 parts, front, back and sides and below gluing the front to the sides using spool clamps.


sábado, 21 de diciembre de 2013

Bass bar fitted

So here´s the front with the bass bar fitted. Tomorrow I will shape it and finetune the plate.


viernes, 20 de diciembre de 2013

f holes cut

Before final thicknessing the front, I have cut the f holes. It starts looking like something familiar.

miércoles, 18 de diciembre de 2013

Outside of the plates finished

here are the top and back plates. They are rough finished, but the final shape is there. the edges and the corners will be finished when the I´ve made the assembly of the body.

domingo, 15 de diciembre de 2013

hollowing out the front and the back

Still working with the gouges. My right hand wrist is getting sour from this work.
On top the back being roughed out. The little holes are drilled with stop, so that I have a thickness of 5mm when I reach the bottom of those holes. Later on the back will be taken down to 2,5 - 4,5mm.
Below the front at 5mm thicmness. It will be taken down to 2,4 - 3,7mm


sábado, 14 de diciembre de 2013

martes, 3 de diciembre de 2013

plates rough cut

So now the hard work starts. All wiil be shaped with hand tools from now on. They are still 16mm thick and will be taken down to 2,4 - 4,5mm.

domingo, 1 de diciembre de 2013

starting the plates

So here the back and front plates have been joined. They are 16mm thick so there´s a lot of work to be done. the top to the left.

jueves, 28 de noviembre de 2013

sides and neck ready for assembly.

Heres the sides and neck ready for assembly. The sides have inner linings and the heel of the neck has been prepared for the sides. The final shapening of the neck and the linings of the sides. Will be done later on.

martes, 19 de noviembre de 2013


Bending the C sides. This is is the most complicated bending that I know of. I can imagine making a 1/16 violin must be really complicated

sábado, 16 de noviembre de 2013

starting up the sides

The first thing to do when starting the the sides is to make and fit the corner blocks and the top and bottom block. Here ther are being glued to the mold.

miércoles, 13 de noviembre de 2013

jueves, 7 de noviembre de 2013

110 finished

#110 is a 2A blanca. 650mm scale, 52mm nut width and finish is French Polish.

The back and sides are what is called silver oak (grevillea robusta) I dont like to use the common name as it creates confusion. Most think its heavy and in family with oak, which is not true. Silver oak is an Australian evergreen much closer to cypress than anything else. The only thing it has in common with oak is the figuring of the wood when perfectly quatersawn.
 In fact, when I thicknessed the back, I did so together with a top grade piece of cypress and I ended up with the same thickness, stiffness and weight and a tap tone just a hair below the taptone of the cypress. And it sounds and feels like cypress. And it looks very good in my opinion.
I will not build more 2A guitars with this wood. I will reserve it for special 1A projects.


miércoles, 6 de noviembre de 2013

#112 finished

Here´s number 112, a 1A Blanca with wooden pegs. scale is 660 and nut width is 53mm. Finish is French polish.

The guitar is for sale


martes, 5 de noviembre de 2013

111 finished

A 2A negra with Padauk/coral back and sides. Very percussive and flamenco. Its for sale. (2000,-€)
650mm scale and 52mm nut. Finish is French polish.


number 109 finished

This is a very nice blanca with mechanical pegs.
Ready to be delivered.


domingo, 3 de noviembre de 2013

Installing "pegheds" tip

Hi

Just a photo I made when installing a set of mechanical pegs from pegheds.com

The installation instructions say that we should drill a 7mm hole and ream the hole to a size so that the pegs are a few milimeters from going all the way through to their final position.
We are then supposed to "cut" a thread in the headstocks wood by turning in the peg   and using the threaded shaft of the peg to do the cutting. We shall turn the shaft of the peg and never turn the head of the peg.
This turning and cutting the thread can be hard for our fingers, so it helps to turn a rubberband around the shaft. As simple as that. My fingers not as good as they were and these little tips help a lot.
 I didn´t find out this by myself, but because I recently installed a set of "pegheds" on a fiddle and the instructions for the pegs said to do use a rubberband. Violin pegs are smaller, meaning that its more difficult to get a good grip on the peg shaft and besides that, you have to cut the thread in maple which is a lot harder than the Spanish cedar used on flamenco guitars.


The guitar is number 109.

martes, 29 de octubre de 2013

miércoles, 23 de octubre de 2013

number 105

Number 105
A steelstring "Orchestra model" based on the scallopped bracing of a Martin OM. Body shape is mine.
Wood is euro spruce top, Flamed Ovangkol back and sides, lacewood bindings and soundport and an olivewood rosette. finished with nitro lacquer.

It plays very well:


viernes, 18 de octubre de 2013

111 and 112 ready to be French polished


So here´s the 2A padauk negra to the left and the 1A peghead blanca to the right.

I have started the porefilling and the French polishing a few days ago and i expect to have guitars 109 - 112 finished the first week in November.

domingo, 6 de octubre de 2013

A short essay about Brazilian Rosewood

Just something I wrote on a forum:

A guy wrote that Brazilian Rosewood was amazing, so I wrote this:


Yes, everything around Brazil rosewood is AMAZING.

Most of all, I find it to be AMAZING that builders still use it and that players buy new guitars made with braz rosewood. I´ll explain:


First of all, the myth concerning braz rosewood is about Rio rosewood or rio palisander (Dalberghia Nigra) and nothing else. The rest is just brownish heavy wood from South America.


its AMAZINGLY illegal. Its been forbidden for decades to chop the trees. And you can only buy the wood legally if it has papers (CITES) Also you can only sell guitars legally legally if it has papers. Try importing a guitar to the USA with Braz rosewood and no CITES and you´ll find out.

You can of course think that you dont care about the environmental situation in Brazil and you can also think that you dont care about these laws and rules. BUT then, please, accept that you cant care about environmental issues where you live and you cant expect people to follow the laws and rules that you find to be important.

There´s an amazing amount of cheating going on when it comes to Braz rosewood and its on all levels including wood cutters, wood dealers and musical instrument makers. All kinds of brownish wood from South America can be found and sold as Braz rosewood.

I know about makers that even though they bought wood called “Caviuna”, they made and sold guitars and said it was Braz rosewood.

Very few persons know how to distinguish the real thing from all the fake. Those of us who have only had a few sets in our hands, we know nothing and can just pray that we havent been cheated and that some dude who bought our Braz rosewood guitar wont send us a lawsuit if its found out that it was Jacaranda or Caviuna we sold under a false name.

Even the specialists find it hard to to distinguish the real thing from fake. Not so many years ago, Maderas Barber in Valencia sold a very pretty wood called Caviuna. It totally looked like high grade Braz rosewood with spider webbing and a deep chocolate color. The authorities blocked the sale of the wood while they were taking DNA tests of the wood. They found out that it was NOT Braz rosewood, so at least Bareber had not been wrong, but it only shows how difficult it is even for experts to see the difference.

I´ve made 3 Braz rosewood guitars and I wont make more. It should be obvious why. The wood I bought pretty cheap on a sale that California based Allied Luhiery had almost 10 years ago. I took the sets to a well known builder who had built several guitars with Braz (Rio) rosewood back in the “good old days”. He told me he coundnt say 100% what it was, but he was pretty sure it was Rio. Allied sold it as “Stump Wood” claiming it didn´t need CITES, but the wood arrived without any papers saying that, so judge yourselves. I just know that the different custom authorities dont care at all about stories. They want paper and nothing else. No correct papers, and you´re out.

Besides that, Braz rosewood is a nice tonewood, but its just a piece of wood and there´s absolutely nothing magical about it. I dont even think its better than many other tonewoods. Its pretty heavy, which I personally dont like to much for flamencos, and its VERY unstable.

To be totally honest, I find it to be a piece of wood for the guitar snobs. Those who think they are so extremely important persons that only the most extreme piece of wood is good enough for them. You know these kind of guys who cant accept to drive a Ford or a Toyota when they go to work, but something a lot “finer”.


martes, 1 de octubre de 2013

bindings

Here numbers 111 and 112 are being "roped" while the glue of the bindings dry.
Number 109 and 110 in background are waiting . When all 4 guitars are finished, I will lacquer the 2A guitars and French polish the 1A guitars